How to Setup Product Filters Using SellKit
Creating an intuitive shopping experience is crucial for any e-commerce store. Product filters allow customers to easily sort through your inventory and find what they're looking for. With SellKit, you can add this functionality directly within the Elementor editor using the exclusive "Product Filters" widget. Here’s a step-by-step guide on how to do it:
To add product filters using SellKit you would need Elementor editor installed on WordPress.
Step 1: Access the Elementor Editor
Begin by opening your WordPress dashboard and navigating to the page you want to insert product filters to. Click on the Edit with Elementor button to launch the Elementor editor.
Step 2: Add a Product Filter Widget
In the Elementor sidebar:
- Type “product” or “filter” in the search bar to quickly find the "Product Filters" widget.
- Drag the "Product Filters" widget from the sidebar into the page next to the product list or product archive.

Considerations for horizontal layout
By default, Product filters in SellKit are displayed horizontally. However, a vertical layout option is also available. If you want to continue using the horizontal layout, it is recommended to set the direction of the parent section in Elementor to vertical Column. Doing so will optimize the display of the horizontal Product filters.

Step 3: Configure the Product Filters Widget
Content Tab
The Content Tab of the SellKit Product Filters widget is where you'll define the filter's appearance and behavior on your online store. Below is a step-by-step guide to configuring the Content Tab in the Elementor editor:
- In the Style dropdown, you can select either Vertical or Horizontal layout for your filters. This will determine how the filters are displayed alongside your products.
- Use the Location dropdown to decide where the applied filters will be displayed on your page. You have options like Top of product list or Top of filters, depending on how you want your filters to interact with the list of products.
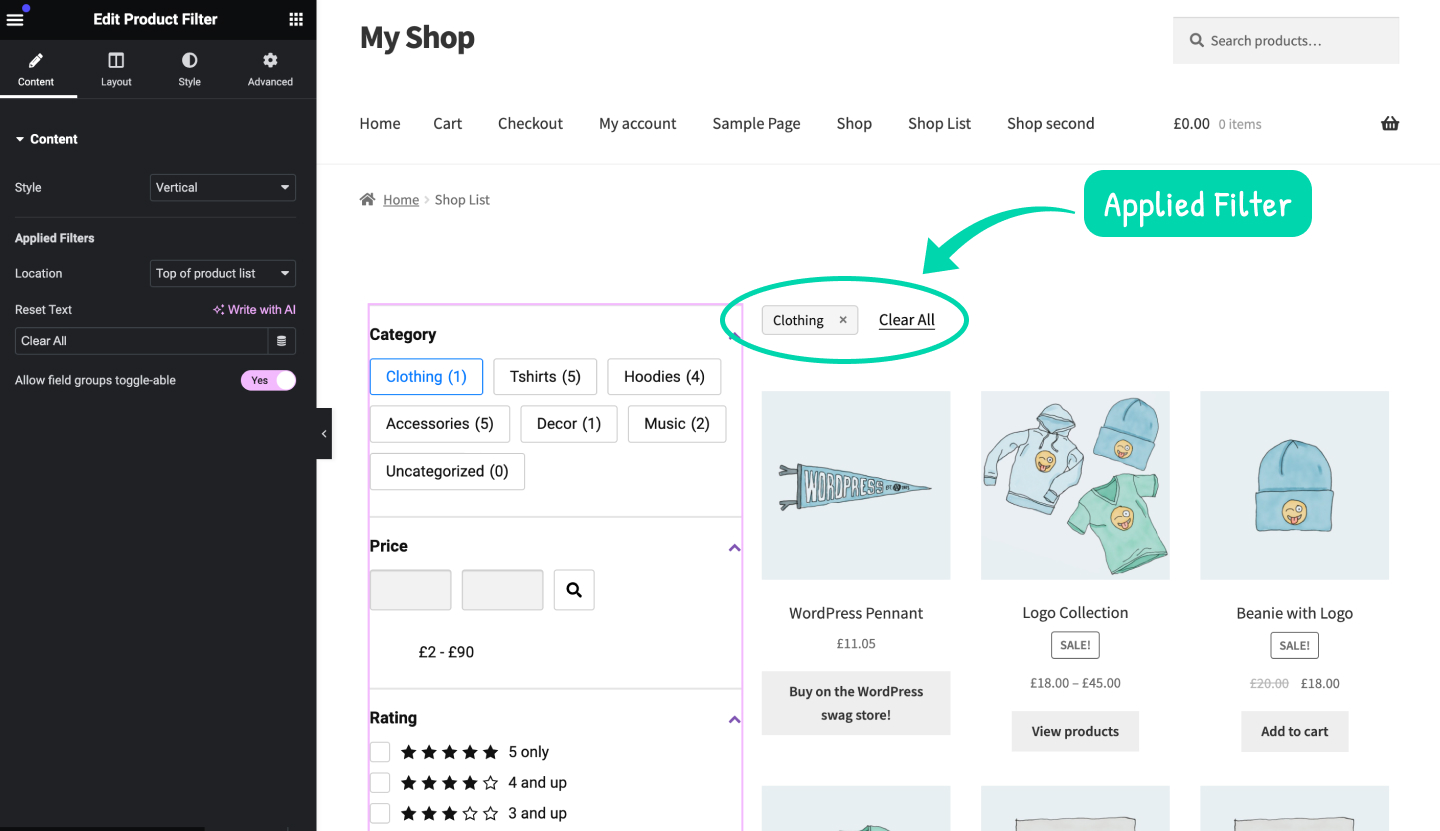
- You can change the text of the reset button by typing into the Reset Text field. This button will allow users to clear all selected filters to start a new search.
- Set the Allow field groups toggle-able switch to Yes if you want to allow your customers to collapse or expand groups of filters for a cleaner look and easier navigation.
Layout Tab
The Layout Tab within the SellKit Product Filters widget allows you to manage which filters are displayed and how they behave. Here is a step-by-step guide to setting up your filter layout:
- Click on the + Add Item button at the bottom of the Layout Tab to introduce a new filter to your widget.
- Once you add a new item, you can choose the Type of filter you want to add from the dropdown menu. The available types include:
- Category
- Tag
- Price
- Rating
- Search Text
- Stock Status
- On Sale
- Custom Attribute
- Sorting
Read More: How To Add Swatches to Product Filters
- For each filter item there are different set of attributes. Play around those options until you can reach the desired outcome.

Style Tab
The Style Tab in the SellKit Product Filters widget provides a comprehensive suite of options to fine-tune the visual presentation of your product filters within the Elementor page builder.
In the Widget section, you can customize the overall look of the filter widget, including setting the Background Color, defining Border Type and Radius, and adjusting the Padding and Margin to create the desired spacing.
As you scroll down, you'll find additional sections like Filter Group, Checkbox List, Radio List, Button List, Link List, and Dropdown. Each of these sections allows you to style the corresponding filter type. For instance, you can set the text color, background, border, and typography for checkboxes, radio buttons, or dropdown menus. This level of customization ensures that every element of the filter can be adjusted to create a cohesive and branded experience for users.
Need help?
Need help with product filters? Contact SellKit support team and we’ll be happy to assist.